A couple of years ago I bought Doodle Stitching by Aimee Ray. The images inspired me to doodle my own artwork, which I did while I was pregs with Ian - now 2 years old as of yesterday. Tempus fugit! Please ignore the fact that the cloud (below) looks like it's giving my house the finger. Or that those giant flowers look like they belong in a remake of Day of the Triffids.
Since my name means "garland" or "wreath" it was only a matter of time before I started making some and covering them in fabric yo-yo's. Each is one-of-a-kind and will look so pretty on your wall or door. Right now I've only made 11" wreaths. I'll be making much bigger ones, I promise! (These suckers take a long time to make.) Pretty wreaths this way.
Be a nice email person by not ignoring emails people send me. And by "people" I mean "Stephanie." I will work on this resolution by doing the following: 1) Click unread message. 2) Read. 3) Think a little. 4) Hit reply. 5) Start typing words. 6) Hit send. 7) Feel confident I've been a nice email person. Just sayin', y'all. (C'mon now, don't pout. This is just for kicks and giggles. It's not directed at you! Unless you're my husband, in which case you wouldn't be reading my blog anyway so we're good, dear reader.)
I am resolute to accomplish the following, dangit. I will! *slams fist into open hand* 1) Expand my tefi repertoire. These past couple of years, I've expanded the kinds of items I make, in addition to jewelry. Years ago I started off with simple beaded jewelry, which I still love making, but have lately fallen in love with fabric and sewing by hand (needle and thread, not machine). Aside from jewelry, I also carry magnets, mirrors, hair clips, bookmarks, coasters, brooches, and most recently - wall art. This year I'd like to add: coffee cozies, buntings, wreaths and notebooks. (The wreaths are already made! Just need to photograph them. They are lovely!) 2) Finish my works-in-progress. Got to finish those stacks of coffee cozies and buntings that I pre-cut months ago. Months, people! Geez. This also means: 3) Reacquaint myself with my dusty sewing machine. Must take a class to boost my comfort level and relearn how to thread a bobbin. A what? Exactly. 4) Open myself up to more inspiration. It's everywhere, around each corner. I feel I am missing opportunities to be inspired because I'm too busy worrying about other things. 5) Stop worrying about other things. Really, what's the point? I could be sewing! 6) Create new fabric necklace designs. I've already got a few new ones on the way. Must create more! I want my designs to be ever-changing, yet true to my vision. Whatever that means. 7) Be more spontaneous. I seriously have a problem with spontaneity, too much of a planner. Must jump in the lake every now and then without checking the temp with my toe. Know what I mean? 8) Pull off my long-planned guerrilla street art. Not gonna say anymore. You'll just have to wait and see if I pull this off finally. (yes it's legal, and yes it's awesome) 9) Begin training Ian for his future tefi internship. Just look at those opposable thumbs! I could use help with some sewing and cutting. I'm only half kidding. HAPPY 2011, Y'ALL!
It's December 23rd, and I betcha half of you haven't finished wrapping gifts yet. Am I right? I, on the other hand, finished a couple of days ago at which point pigs actually began to fly. I know, crazy. So for those of you still in need of some gift wrapping encouragement and ideas, I've scoured the interwebs to find some simply, fun and totally DIY gift wrap ideas. No grab those scissors and get ready to wrap!
Potato stamps, marbling and googly eyes, I would expect nothing less from UO.
And finally, here's a list of some of my very own DIY gift wrap must-haves: - fabric and felt scraps - baker's twine - raffia in various colors - burlap - pine cones, acorn caps and other things gathered from my backyard - old clothes that can be cut up to use as wrapping - large wooden beads Happy Wrapping, y'all! by Stephanie/tefi
After an incredibly successful Jingle Bash, followed by a boon of online sales and setting up my new shop at Indie Genius, I've finally begun creating more fabric pieces to list in my Etsy shop. Whew. Here are four new brooches made with the finest linen fabric from Kokka's Echino line. Get 'em now so I can keep making more! Also, new necklace designs in the making just in time for release this Spring! (if not sooner since I can't keep a lid on my designs). Stay tuned! [Notice the slab I used as a backdrop for my brooches (above). I took it from a pile of rubble left over from the 94-year old Oak Cliff Christian church that DISD saw fit to tear down to make room for a softball field. It was a beautiful old church just blocks from where Lee Harvey Oswald shot Officer Tippet then escaped to the Texas Theater just before being arrested. This is where I live.]
I betcha my slab is pictured in the pile of rubble above. *sigh* First photo: credit unknown Second photo: Melissa Hennings
Reposted from the Etsy Dallas blog; written and handmade by Cheyne of CutOutAndCollect When it came time to decorate for our Jingle Bash, the Deco Squad planners (Cheyne, Laura and Larry) really wanted to echo the theme created in our gorgeous event fliers, by our own Christina of paperfingers.We decided to make a very simple felt garland that played on her beautiful leafy design. We ended up liking the garland so much that we wanted to share how to make it! It's seriously quick, inexpensive, and very versatile. Not crafty yourself? Skip to the bottom to find out how you can win the tutorial example - a 12 foot handmade garland the perfect length to decorate a doorway or mantle!What you'll need: - felt* - scissors - thread to match your most frequently occurring felt color - sewing machin - holiday music playlist worthy of your awesomeness. (Wham!'s "Last Christmas" on repeat is clearly your only option.) - hot chocolate or coffee. (It works like magic, trust me.) * We approximate the felt turns into at least 6 feet of garland per half yard of 36" wide felt on the bolt. So if you'd like at least 18 feet, buy 1.5 yards total. This is approximate and will vary on the leaf size, the spacing when sewn together, and how conservatively you lay out your leafs for cutting.
STEP 1
Choose your garland color scheme and gather your supplies. The Deco Squad chose the colors to match our Jingle Bash artwork. I'd love to do a gorgeous aqua and silver/grey garland!
STEP 2
Turn up "Last Christmas" on high volume, get that hot chocolate close to you, find a table to get to cutting. This step is clearly very important.
STEP 3
Cut your felt into nice little leaves. We made the ones for the Jingle Bash fairly large because we need to cover larger areas. I made my example leaves about 3 inches long. If you're not comfortable with a trial and error approach of cutting directly on the felt, draw out some leaves on paper and hold/pin the paper to the felt and cut around your drawn shape. After you've found the shape and size you like, it's easy to hold the original leaf onto the felt and cut replicas. Don't like our shape or need to print out a template? Click here to help you find something you like.
STEP 4
Work out the placement of your leaves. I chose three colors for the example garland so the colors would alternate well. Tip: You can pin your leaves to each other or on to a tracing paper backing if you aren't comfortable with placing them as you sew. Just rip the tracing paper off after it's sewn together. I chose to skip this step because I found it was easier to play with the placement as I sewed. You should be able to keep a straight stitch down the middle of the garland, catching the bottom/side of each leaf as you sew down. If you chose not to pin your leaves together, just add each leaf as you sew, paying attention to placement. Here's a tiny video of how that's done:
Tip: You may find that stitching in a curve back and forth catches more of each leaf and make a more structured garland. Be prepared to play with it a bit! And don't be completely scared of the seam ripper if you don't like your first try! Warning! This requires your hands to be very close to the needle. Please be aware of where your hands are. I've sewn through my fingernail (not with this project). I don't recommend it. It doesn't leave a cool war wound, it's mainly just painful and scary.
STEP 6
Drape it up on your mantle, on your tree, or in the doorway. Pretty! Put your own spin on it! Sew some ribbon on the end to tie to things, sew a short version with ribbon ends and make a grecian headband, choose super high quality wool felt and make a scarf! Show us what you make!
Or skip all that and comment on this blog post to win our leafy garland. Include your email address and we'll pick a winner at random to receive our sample garland in the mail in time for Christmas! Comments close Wednesday December 15th at midnight. Reblog and link in the comments for a second entry! US residents only, please!
 Please ignore the fact that the cloud (below) looks like it's giving my house the finger. Or that those giant flowers look like they belong in a remake of Day of the Triffids.


 Since my name means "garland" or "wreath" it was only a matter of time before I started making some and covering them in fabric yo-yo's. Each is one-of-a-kind and will look so pretty on your wall or door. Right now I've only made 11" wreaths. I'll be making much bigger ones, I promise! (These suckers take a long time to make.) Pretty wreaths this way.
 2) Finish my works-in-progress. Got to finish those stacks of coffee cozies and buntings that I pre-cut months ago. Months, people! Geez. This also means: 3) Reacquaint myself with my dusty sewing machine. Must take a class to boost my comfort level and relearn how to thread a bobbin. A what? Exactly. 4) Open myself up to more inspiration. It's everywhere, around each corner. I feel I am missing opportunities to be inspired because I'm too busy worrying about other things. 5) Stop worrying about other things. Really, what's the point? I could be sewing!
 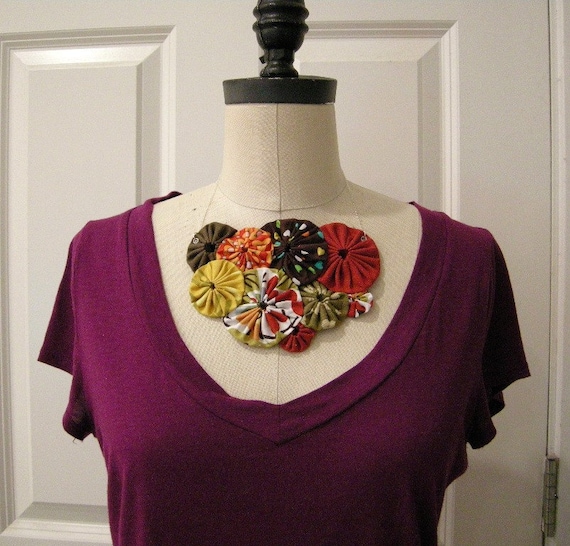 6) Create new fabric necklace designs. I've already got a few new ones on the way. Must create more! I want my designs to be ever-changing, yet true to my vision. Whatever that means. 7) Be more spontaneous. I seriously have a problem with spontaneity, too much of a planner. Must jump in the lake every now and then without checking the temp with my toe. Know what I mean? 8) Pull off my long-planned guerrilla street art. Not gonna say anymore. You'll just have to wait and see if I pull this off finally. (yes it's legal, and yes it's awesome)
  9) Begin training Ian for his future tefi internship. Just look at those opposable thumbs! I could use help with some sewing and cutting. I'm only half kidding. HAPPY 2011, Y'ALL!
  Shoestrings and kerchiefs never looked so cute.
  A pair of baby socks look like mini-stockings. Gimme gimme.
  A sweet collection of gift wrap ideas by Greg Likes Weddings.
  Potato stamps, marbling and googly eyes, I would expect nothing less from UO.
  After an incredibly successful Jingle Bash, followed by a boon of online sales and setting up my new shop at Indie Genius, I've finally begun creating more fabric pieces to list in my Etsy shop. Whew. Here are four new brooches made with the finest linen fabric from Kokka's Echino line. Get 'em now so I can keep making more!
  Also, new necklace designs in the making just in time for release this Spring! (if not sooner since I can't keep a lid on my designs). Stay tuned! [Notice the slab I used as a backdrop for my brooches (above). I took it from a pile of rubble left over from the 94-year old Oak Cliff Christian church that DISD saw fit to tear down to make room for a softball field. It was a beautiful old church just blocks from where Lee Harvey Oswald shot Officer Tippet then escaped to the Texas Theater just before being arrested. This is where I live.]
  When it came time to decorate for our Jingle Bash, the Deco Squad planners (Cheyne, Laura and Larry) really wanted to echo the theme created in our gorgeous event fliers, by our own Christina of paperfingers. We decided to make a very simple felt garland that played on her beautiful leafy design. We ended up liking the garland so much that we wanted to share how to make it! It's seriously quick, inexpensive, and very versatile. Not crafty yourself? Skip to the bottom to find out how you can win the tutorial example - a 12 foot handmade garland the perfect length to decorate a doorway or mantle!
  What you'll need: - felt* - scissors - thread to match your most frequently occurring felt color - sewing machin - holiday music playlist worthy of your awesomeness. (Wham!'s "Last Christmas" on repeat is clearly your only option.) - hot chocolate or coffee. (It works like magic, trust me.) * We approximate the felt turns into at least 6 feet of garland per half yard of 36" wide felt on the bolt. So if you'd like at least 18 feet, buy 1.5 yards total. This is approximate and will vary on the leaf size, the spacing when sewn together, and how conservatively you lay out your leafs for cutting.

 STEP 4
  You should be able to keep a straight stitch down the middle of the garland, catching the bottom/side of each leaf as you sew down. If you chose not to pin your leaves together, just add each leaf as you sew, paying attention to placement. Here's a tiny video of how that's done:
 STEP 6
  Put your own spin on it! Sew some ribbon on the end to tie to things, sew a short version with ribbon ends and make a grecian headband, choose super high quality wool felt and make a scarf! Show us what you make!
 Or skip all that and comment on this blog post to win our leafy garland. Include your email address and we'll pick a winner at random to receive our sample garland in the mail in time for Christmas! Comments close Wednesday December 15th at midnight. Reblog and link in the comments for a second entry! US residents only, please!